


Cutting boards are an excellent tool for your kitchen. They can protect your countertops when you are working with knives. However, shopping for cutting boards could quickly become expensive. But if you would rather pick up a high quality but reasonably priced board check out Artisan Born’s amazing walnut cutting boards available on their Etsy shop: Black Walnut Wood Cutting Board, Solid Walnut Live Edge Cutting Board, and Live Edge Walnut Slab Cutting Board.
Learning how to make a cutting board could be a useful trick to save you money in the long run. However, learning how to make a cutting board can be tricky, as it requires a multitude of steps.
Fortunately, we’re here to help. We recommend getting started by first watching this YouTube video from I Like to Make Stuff. Then, keep reading for a comprehensive guide to learning how to make a cutting board.
What You’ll Need
- Table Saw
- Miter Saw
- Sander
- Planer
- Router
- Clamps
- Roundover Bit
- Wood – any type
- Mineral oil
- Wood glue
- A blend of beeswax and oil
- Glubot
- Sandpaper
- Glue brush
Step-by-Step Guide
Below, you’ll find a step-by-step guide for how to make a beautiful cutting board.
Prepare Your Wood
When you’re ready to begin building your cutting board, the first thing you’re going to need to do is prepare your wood. One of the greatest things about a DIY cutting board project is that you can use scrap wood laying around your workshop.
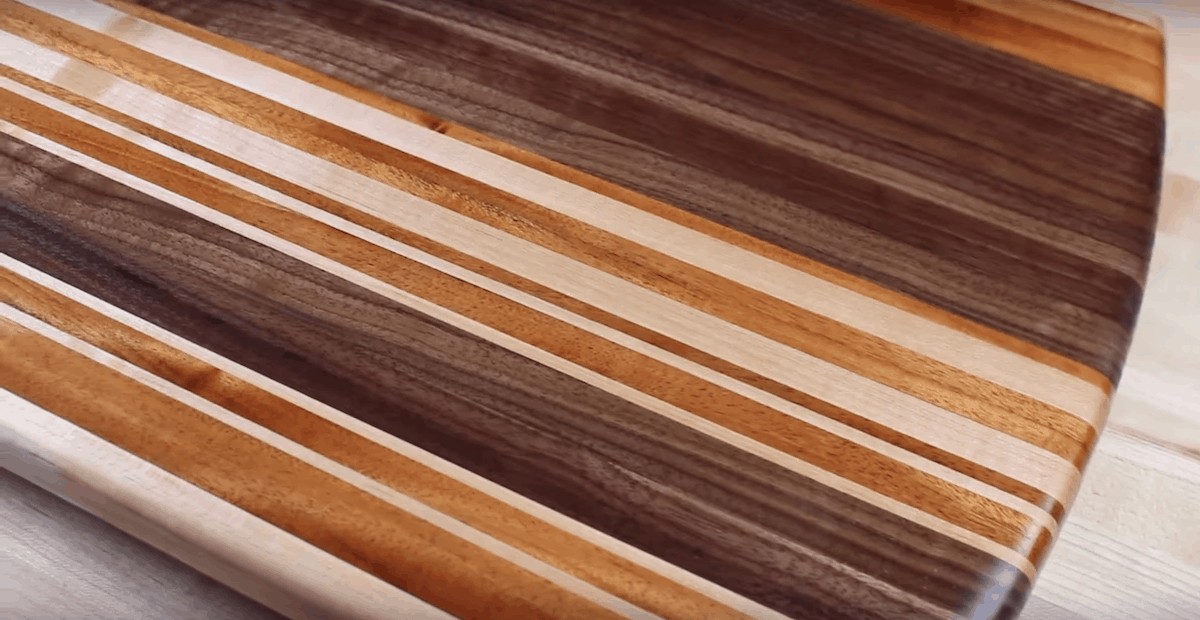
Ideally, the wood that you use would be dense hardwood. However, any wood will realistically do the trick. For instance, using a combination of scrap wood, such as cherry, walnut, maple, and mahogany, could provide you with a patchwork cutting board with a rustic look.
You should look to use wood that is at least 1” thick. If you need to, you can glue wood together to make the cutting board thicker as well. You’ll also want to make sure that the wood you select is not warped.
Once you’ve selected your wood, you’ll want to make sure that everything is of the same height and length. Start by using your miter saw to cut the wood to consistent-sized chunks. The length that you select will end up being the length of the cutting board.
We recommend using wood at least 12” long. However, don’t shy away from using longer pieces of wood stretching 16” to 18”. If you have a quality miter saw, you can set up a stop block so that you can cut at consistent lengths.
If you are going to buy wood explicitly for this project, we recommend going through a mill or cabinet shop as opposed to your local hardware store. When you purchase wood through a mill or cabinet shop, there’s a higher chance that the material has been cut precisely.
Plan Your Design
Once you’ve cut your wood to a consistent size, it’s time for you to begin planning your design. If you need to alter the width of the wood, now would be the time to do so with your table saw.
When laying out your wood pieces, you should seek to alternate the end grain. Alternating the end grain is one of the best ways to minimize the likelihood of warping. For instance, if the arc of the center grain piece of your board faces down, then the arc on the surrounding parts should face up.
After choosing your layout, you should know which sides of your wooden pieces are going to need glue. Run the sides that will require glue through a planer.
If you do not run your wood through the planer, you’ll end up having an uneven cutting board. You’ll want to make sure that the sides of your wood are flat and smooth before you glue your pieces together. You may need to run your wood through the planer more than once to do so.
Glue Your Pieces Together
After putting your wooden pieces through the planer, it’s time to glue everything together. Choosing a quality wood glue, such as Titebond II, allows you to hold your cutting board together without having to use things such as dowels or biscuits.
When gluing your board, you’ll want to make sure that you use clamps, while placing cauls between the end boards and the faces of the clamps. Clamp cauls are especially critical if you’re using a softer wood. Using cauls will spread pressure throughout the board evenly and will reduce the likelihood of your final product having dents or indentations.
Glue your board together one piece at a time. You can use your glue brush to apply the adhesive evenly. When tightening your clamps, make sure that you adjust the boards equally as well. Doing so will help keep them flat.
As you tighten the clamps, you’ll likely find that excess glue seeps through the cranks of the various wooden panels. We recommend using a wet rag to wipe away excess adhesive. You’ll probably find it easier to wipe away glue while it’s still wet instead of trying to remove dried glue from the board.
Plane the Cutting Board
Once the glue dries, you should have a large block of wood in either a square or rectangular shape. Remove the clamps so that you can run your wood through your planer again. Use the skip-planing method when doing so.
The skip-planing method calls for you to flip the board end-over-end when passing it through your machine. This method ensures that both sides of the board smooth evenly. You’ll want to continually run your cutting board through the planer until the wood is smooth on both sides.
You’ll also want to smooth the ends of your cutting board as well. There’s a strong chance that your planer won’t work for this. Instead, consider using something like a crosscut sled on your table saw to help with this.
Lastly, now would be the time for you to add decorative cuts into your board. To add a decorative edge, we recommend using a round over bit in a router. When it comes to using a router for decorative designs, the possibilities are endless.
One such example of a nice feature that you could add is finger grips. Many people choose to put finger grips at the end of the board, often making the board more comfortable to use. If you wish to put finger grips into the board, we recommend using a commercial template or tracing the outline of your fingers on the board with a pencil.
Remember that when using a router, you don’t want the bit to bottom out. Gently push the bit into the wood until it touches. Never force the bit far enough in that the shank rests on the chuck.
Sand and Oil Your Board
Once you’ve completed the cutting board design, it’s time to begin preparing it for use in your kitchen. Remember that a planer is not a substitute for sanding. If you want to produce a high-quality cutting board, you’ll need to put it through multiple rounds of sanding. You’ll likely want to use sandpapers with the following grits:
- 100
- 150
- 220
- 320
- 400
Feel free to use grades between those, depending on the coarseness of your cutting board. Before using your 220 sandpaper, we recommend “raising the grain” by spraying your cutting board with water. After spraying, wipe the water off. Allow the board to dry before using the 220 paper.
By spraying water on the cutting board, you’re raising the cut wood fibers. This allows you to create an incredibly smooth product.
If you don’t raise the grain, your cutting board will still likely feel smooth to touch. However, after you wash it for the first time, your cutting board will be very rough. There’s also a chance that microscopic wood fibers could make their way into your food.
We recommend raising the grain at least twice when putting the finishing touches on your sanding. After completing two “raising the grain” cycles, you’ll then want to use 320 grit and 400 grit sandpaper to provide your cutting board with the smoothest finish possible.
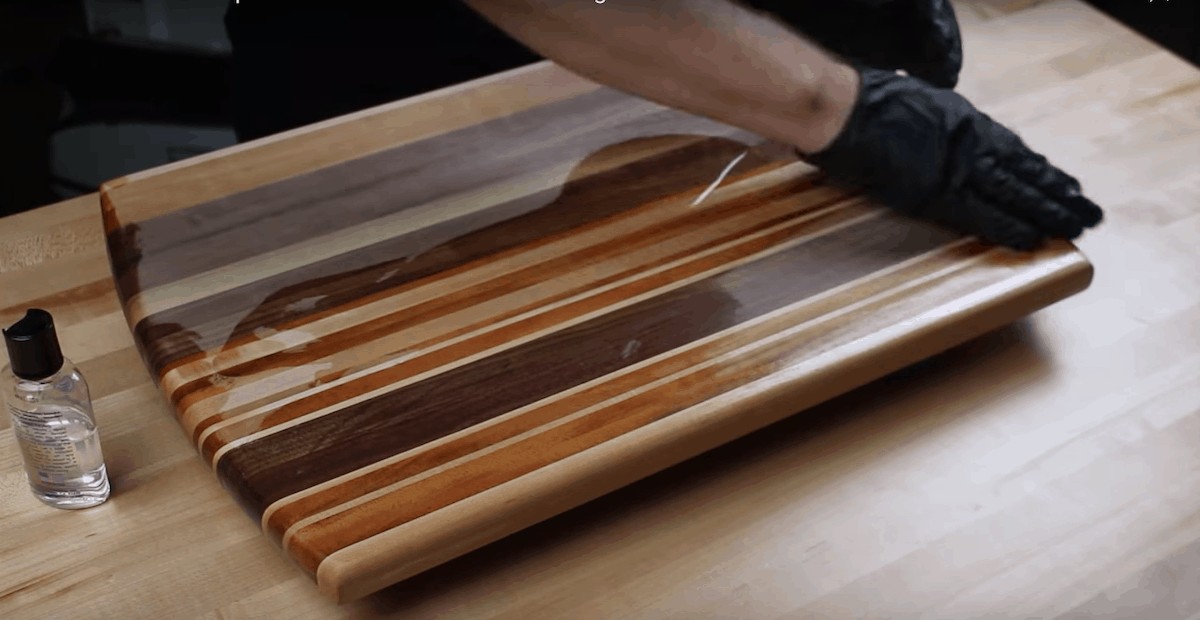
After sanding, you’ll need to apply a finish to your cutting board. Begin by adding mineral oil to your board. Be sure to do so evenly. Allow the mineral oil to sit for roughly five minutes, and then wipe off any excess. Allow your board time to dry before adding additional coats. Repeat this process at least one more time.
After the mineral oil coat has dried, you can then add a combination of beeswax and mineral oil. This solution is beneficial for two reasons. First and foremost, it waterproofs your cutting board a little bit. Secondly, you can buff your cutting board so that it has a shiny finish.
Maintain Your Cutting Board
If you want your cutting board to last, you’re going to have to care for it. The best way to do so is by applying mineral oil any time the board begins to look dry. Some people believe that you should apply mineral oil to your board once a day for the first month, once a week for the second month, and then once a month after that.
Those expectations are a bit unrealistic. However, you should make sure that you reapply the oil anytime the wood begins to look dry.
Other Tips for Cutting Board Construction
If you’re looking to build a cutting board, there are a few other things that you should remember. First and foremost, it’s vital that you practice proper safety techniques when constructing your board.
Too often, people let their guard down when building cutting boards, as the process involves a lot of gluing and waiting. However, when you use power tools to create your board, make sure that you use the product as intended. Also, make sure that you use proper eye and ear protection when using power tools as well.
Second, we recommend practicing with different tools before beginning your project, especially if you don’t have much experience working with these devices. For instance, imagine you are going to use a router to put a slot for your fingers into the edge of the cutting board.
By the time that you’re going to do this, you’ll have already glued the piece together and planed it multiple times. If you mess up with the router, there’s no going back and correcting your mistake.
You could potentially remove that plank of wood and install a new one, but doing so will take up a lot of time. It’s always better to practice your cuts on scrap wood before actually making the cuts on your cutting board product.
Third, remember that the cutting board is going to come into contact with food. Only use finishing products that are safe for humans. You should never stain your cutting board. Doing so could potentially contaminate your food.
If you wish to change the color of your cutting board, we recommend using different shades of wood. Redwood is one such type of wood that could provide you with deep hues ideal for a cutting board.
Lastly, remember to exhibit patience when constructing a cutting board. A quality cutting board could last for years, especially if you care for it properly. With so many tedious steps, it’s easy to grow impatient when constructing the board.
However, practicing patience will increase the likelihood of you having a breathtaking piece that you’re proud to display in your kitchen. Creating a cutting board is a marathon, not a sprint. Be sure to take your time.
Make a Cutting Board in No Time
Learning how to make a cutting board could be well worth your while. Not only does doing so save you money, but it will also provide you with a sense of pride as well. We hope that the guide that we offered serves you well, allowing you to create a cutting board that’s stunning.
We’re willing to bet that once you get the hang of knowing to how to make a cutting board, you’ll not only want to update your kitchen, but you’ll want to share your talent with others as well. Cutting boards can make for excellent gifts that your friends and family are sure to love.