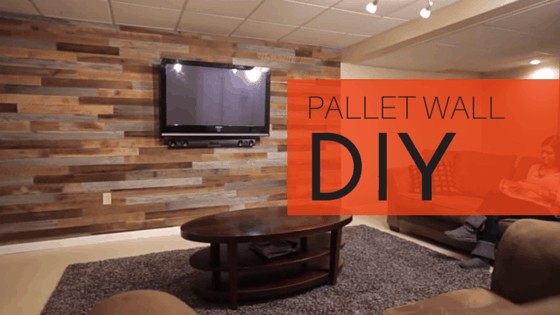
Creating an accent wall out of reclaimed pallet wood is such a simple and cheap project!
It also looks amazing, and will be sure to have your guests talking.
Here is a step by step tutorial on how you can create this on virtually any wall of your house from Wabash Lumber on YouTube.
What you'll need:
- Pallets (number depends on size of wall)
- Pallet buster (to disassemble pallet boards)
- Miter Saw (this one works well)
- Pencil
- Level
- Liquid Nails
Ready to get started?
1. MEASURE THE WALL
This will give you an idea about how many planks you’ll need, which also lets you decide how many pallets it will take. It’s hard to estimate since every pallet is different, and has a different amount of planks on it.
There are tons of things you can do with pallets, so it never hurts to get too many!

If it helps, dividing the length + width of your surface and dividing by 144 will give you the total amount of square feet you’ll need. It takes about 7 or 8 pallet boards to get 10 square feet.

2. PREPARE SURFACE
Clean the wall with some soap and water, and make sure to pull out any nails or items that may cause an issue when you hang the boards.

3. DETERMINE A PATTERN
We’re going to do a staggered horizontal design, but if you are going to align your boards differently, now is the time to decide.

4. DRAW A REFERENCE LINE
Using your level and pencil, draw a straight line across the area where you’ll be laying the boards. This will be your starting point and make sure that your first boards are completely level and straight, so the wall doesn’t get crooked!

5. ADD PLANKS ON REFERENCE LINE
Using your liquid nails (or other construction adhesive) apply a liberal amount to the back of your first board. Place the first board directly above or below your reference line and press it onto the wall. Make sure this plank is level.
Then, apply a second board on the other side of the reference line – staggering the boards as shown below.


6. FILL IN THE ENTIRE SPACE
Using a miter saw to cut/trim boards as needed, fill in the entire space staring with the boards along the reference line. Simply repeat the steps over and over until your project is complete.


Now you’re done!
Enjoy your pallet wall for years to come!
I am really impressed with the look of your pallet wall! I think that is such a creative idea. My wife and I have been trying to come up with something fun an different we could do with the interior of our home. We’ll have to look into this more! Thanks for sharing!
Does the wood shrink? Did you prepare the wood any way? Planing, staining?
Those boards don’t look like any of the pallets I’ve seen. Are they from a specific place? Wall looks great!
Darlene
Did you use a specific stain/paint? We are looking for these colors so we’d love to be able to recreate it!