Table saws are the perfect tool for cutting and ripping small to medium-sized pieces of lumber. The table saw will make great rips on its own– cuts parallel to the wood grain. However, a miter gauge can expand your table saw to allow you to make the perfect angled crosscuts with ease.
Your table saw has lots of parts and pieces. There’s the rip fence, which is a cutting guide that runs across the table parallel to the blade. But what about the miter gauge?
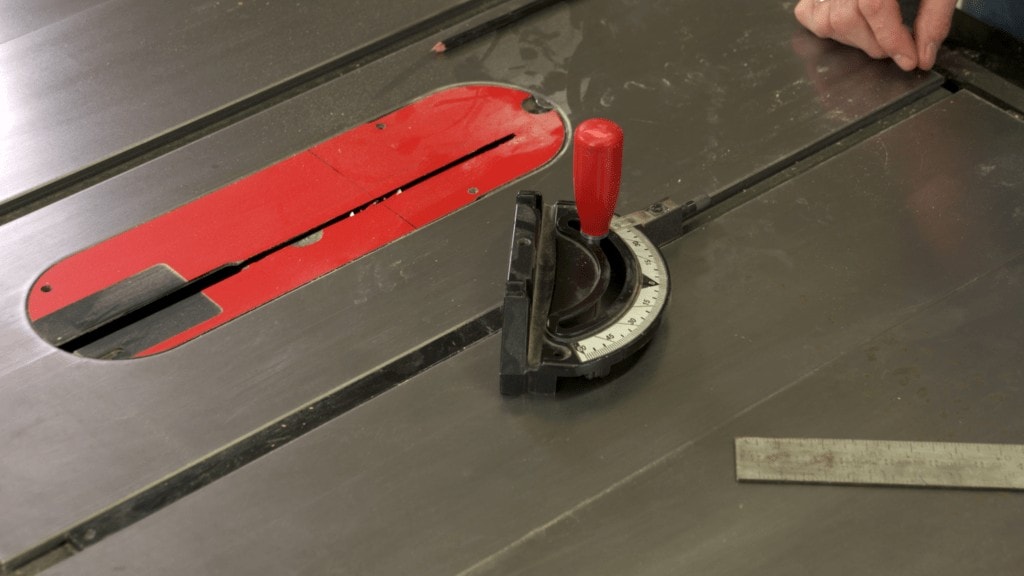
The miter gauge looks sort of like a fancy protractor stuck to your table saw. The miter gauge holds your material in place while guiding it at the angle you need to make your cut. The gauge has a full range from -45 to 45 degrees and locks firmly in place to keep your cut clean and neat every time.
Many table saws will come with their own miter gauges built-in, but there are tons that you can buy on the secondary market that are even more precise allowing you to create beautiful square, angled, and even compound crosscuts for your woodworking project. While they’re often more expensive, they make your final product much more clean, neat, and attractive. Impressive and skillful work takes the right tools for the job, and your miter gauge is a crucial part of your woodworking journey.
Table of contents
How to Use a Miter Gauge
All you have to do is line up the sheet with the straight end of the miter gauge. Then, push the pieces together with the miter gauge facing towards the saw blade. Your table saw will make a clean cut at the angle you set with the miter slot. Just lock and cut.
Miter gauges can make square cuts and angled cross-cuts along with all kinds of unique and special cuts.
Cross Cuts
You can make a cross-cut by sliding the miter gauge back towards you. Put the board against the straight part of the gauge as before. Draw a mark where you want your cut, and line it up with the saw blade. Turn on the motor and push the miter gauge towards the blade keeping the board in place against the straight end of the gauge. When you’re done, pull the board out and away from the saw blade and pull the assembly back. Then, turn off the motor.
Square Cross Cuts
You can make a simple square cross-cut by setting to 0 (or sometimes your miter gauge might read 90) and making your cut. You’ll get a nice clean straight cut across the board. To prep your table saw, start with it unplugged so that you can safely raise the assembly to its maximum height. Slide the miter gauge until it’s in line with the front of the stationary saw blade. You can check that your gauge is accurate by putting the edge of a combination saw against the edge of the miter gauge. If they align at 0, then your gauge is calibrated properly.
Angled Cross Cuts
Of course, you can also make a nice clean angle by putting your gauge at 45 degrees. It works the same way, but as mentioned above, you want to keep the board firmly in place against the flat edge of the miter gauge to get a smooth and even cut. It’s also important to note that with angled crosscuts, you’ll want to apply slightly more pressure but move at a slower pace. The grain of the wood will tend to fight back at you more which can result in a less clean cut.
Compound Cuts
A compound cut is an angled crosscut at a beveled angle. There are several safe techniques for performing this, and some table saws allow you to slightly adjust the bevel of the blade itself for this purpose.
Tips and Safety Notes
Don’t use your fence together with the miter gauge when attempting to make a crosscut. You don’t want any moving parts besides the tabletop, and if you press the board against the fence, it may slide as it makes contact with the saw kicking it up into the air. If you’re making any angled cross cuts, it’s recommended that you take off the fence or move it out of the way so you can use your miter gauge.
Don’t perform crosscuts on boards that are more than 4 feet long with your table saw and miter gauge. Most table saws are just too small for lumber at that size, and you’ll want to employ a more appropriate tool for your larger job.
As always, make sure to wear the proper safety gear and work with your fingers away from the blade. Remove any jewelry and all loose-fitting clothes, and never forget to wear your safety goggles when using your table saw.
Always be sure to exercise safe practices when working with power tools. It can be a good idea to watch an instructional video if you’ve never used a miter gauge to get an even better concept of how to operate one.
In order to make clean edges that join neatly and securely, always calculate and measure each piece twice before cutting. Sand your cuts to make them smooth and clean, as any debris or uneven surfaces will compromise the look and integrity of your final project.