
Epoxy countertops are stunningly gorgeous countertops that are popular in kitchens and bathrooms all over the world. Epoxy for countertops creates unique and captivating visuals that add flair and pop to any interior. Putting epoxy countertops in your home might be appealing, but is it the right choice for you? Should you install it yourself, or call in a pro? If you’re considering redoing your kitchen countertops, here’s everything you need to know about epoxy countertop surfaces.
What Are Epoxy Countertops?
Epoxy is a thermosetting polymer that’s used to fill in or cover over certain spaces. Unlike countertops made from laminate or quartz, you don’t buy a prefabricated epoxy countertop at the local kitchen and bath showroom. Instead, epoxy countertops are set overtop of an existing material. While there are pre-made epoxy counters available, they’re not common and they’re much more expensive than other new countertop products.
Advantages of Epoxy Countertops
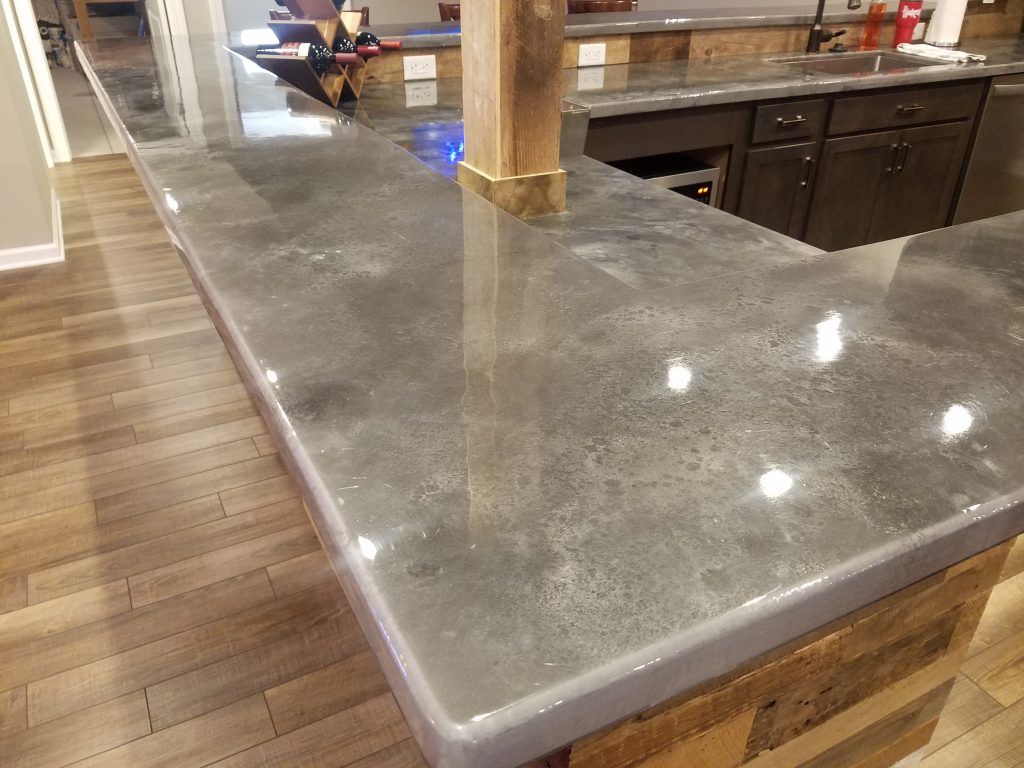
Epoxy countertops have interesting streaks and patterns in them that make them much more visually appealing than materials like granite. Plus, epoxy is a super-strong material that makes the perfect surface for rough use in the kitchen. It’s also completely food safe and will last for many years if treated with care.
Because you can pour epoxy over an existing counter, countertop epoxy is often much cheaper than installing an entirely new countertop surface. Epoxy resin is widely available in a huge range of colors, and it can be mixed to create completely unique creations that you won’t see on kitchen countertops anywhere outside your own home.
While a single epoxy job can be a challenge, epoxy is the sort of work that can be re-done when you decide you want to freshen up the look in your kitchen or bathroom. Plus, once you’ve done one or two epoxy surface jobs, it gets easier to repeat the next time.
Disadvantages of Epoxy Countertops and Alternative Choices
Most notably, epoxy resin is fast-drying meaning that you have to work quickly when pouring it. It’s very easy to make mistakes while pouring an epoxy countertop, and even small mistakes can spell demise for your entire project.
While the epoxy look is striking and unique, it’s very difficult to get exactly what you picture in your mind before you start. Working with epoxy is a science and an art. The art comes down to how well you can work the colors in and shape the streaks without overdoing it or blending colors that don’t work. You’ll want to look at a lot of examples of epoxy countertops before undertaking your own work, and if you hire a professional, there’s no way to guarantee you get exactly what you want.
Are Epoxy Countertops Right for Your Home?
The short answer is that it’s up to you. The slightly longer answer is that epoxy countertops can be poured over almost any countertop surface, so if you want them, it’s very likely that you won’t have to redo your entire counter to get them.
The first thing you need to decide is whether it matches your decor. Epoxy countertops can be flashy or they can be subtle, but they have a certain glossy and finished look that doesn’t go with every kitchen or bathroom. They’re fantastic as far as sturdy and reliable countertops go, but they are a little bit bulkier than many counters.
DIY Epoxy vs. Professional Installation
Then you have to decide if you want to do the job yourself or if you want to hire it out to a professional. Pouring an epoxy countertop isn’t like painting your walls. It’s a more complicated DIY project with more steps, and more steps mean more opportunities to make a mistake.
However, epoxy resin itself is insanely cheap when compared even with laminate sheets, given that the quality is vastly superior. If you’re confident that you can work fast without making mistakes, and you’re willing to start from scratch if you do mess up, then a DIY epoxy countertop is a satisfying project to complete.
On the other hand, most homeowners don’t want to take on a job quite as large as pouring their own new countertops. And, to be sure, pouring epoxy is messy and can lead to problems if your job gets out of control. Hiring a professional to pour your epoxy countertops for you comes with a few advantages.
A contractor will have experience in pouring epoxy resin as it’s a job they likely perform on a regular basis. Plus, you’ll often have some recourse if the job isn’t done right. Hiring a contractor is a good way to ensure you get a high-quality counter on the first try without the mess.
Of course, contractors are expensive. You might spend as much on one hour of a contractor’s time as you’d spend on all the materials of the job if you did it yourself. Is the investment worth the time savings? That’s for you to decide. And if you don’t think it is, take a look at how you can make a new epoxy countertop surface for yourself.
Making Your Own Epoxy Countertops
As we’ve described, pouring epoxy countertops is tricky and leaves lots of room for error. Before you even begin, make sure you read and thoroughly understand each and every step of the process so that you can recite it from memory. At certain points in the procedure, once you start, you’re on the clock and unable to stop. Don’t ruin your entire project just because you stopped to say, “Wait, what’s next?”
Tools and Materials You’ll Need
You’ll need some power tools and a lot of material for this job. If you don’t have power tools on hand, you can see about renting them from a hardware store or borrowing some from a friend or neighbor.
For your epoxy countertop job, you’ll need:
- Trim Router
- Orbital Sander
- Oscillating Tool
- Power Drill
- Brushes & 6″ Paint Roller
As far as materials for the countertop itself, you’re going to need:
- Epoxy resin and highlights
- Two mixing paddles
- Two large buckets (2gal)
- Two roller sleeves, 6″ 3/8″ nap
- Sanding sponges
- Isopropyl alcohol and a spray bottle
- Painter’s tape
- Plastic sheets and scrap cardboard for splatter protection
- 1qt cups for mixing, at least four
Safety and Protection for Your Kitchen
You’re going to need a lot of durable plastic sheets and some cardboard to hang from your lower cabinets and lie around the floor to protect them from drips and splashes while you’re working with the epoxy. You’ll also want to wear old clothes; even a little bit of epoxy resin on your clothes will doom them to the trash heap.
It’s important to avoid getting any epoxy resin on your hands, so wear gloves while working with it for personal safety. And, as with all projects, never forget to wear your protective eyeglasses when installing epoxy countertops.
Preparing Your Materials All At Once
Step 3 below details priming your existing countertops for pouring the epoxy. Once you begin this phase of the project, you’re on a strict time limit. For this reason, it’s important to have all of your tools and materials on hand, laid out, and organized in your workspace before you start. The only thing you don’t want to actually do ahead of time is mix the highlights.
You’ll also need to remove your sink and any fixtures from the counter before pouring the epoxy. It’s easiest to just do this before you start the job. Set up your plastic and cardboard protectors, and you’re about ready to begin.
How to Create Your Epoxy Countertops
Step 0: Remove the Backsplash
This step is optional, depending on whether or not you want to keep your old backsplash with your new epoxy countertops. If you’ve chosen a similar color, your existing backsplash may be a good match. However, this is often not the case.
Using your oscillating tool, you can cut into the bottom of the backsplash positioning the carbide blade flush with the counter. Once you remove the backsplash, you’ll need to fill the gap between the counter and the wall and sand it down.
Step 1: Round Off Corners
When applying a finish to any surface, sharp corners will cause an inconsistent an undesirable drip-over that ruins the appearance of the surface. If your counter has sharp edges, you’ll need to use your router’s round-over bit to round off the corners of the countertop. For best results, try a 3/8″ round-over bit to ensure tight bonding and smooth flow.
Step 2: Patch the Counter and Smooth Over
Your countertop is made in sections and will have some seams, particularly at the corners. Fill in all of these seams and any other openings (except for fixtures, of course) with body filler. Make sure to apply the filler across the countertop, the front, and gaps and the seams around the counter. Filler dries and hardens quickly, so you won’t have to wait long for this to set before you can proceed, but you’ll want to work fast.
Use your orbital sander to smooth over the surface, and then smooth the rounded edge and corners with coarse sandpaper. This will provide a smooth and consistent countertop surface while being rough enough to help the epoxy resin bind to the surface.
Step 3: Apply the Primer
Mix your two-part primer in a bucket and use your paint roller to apply it to the countertop. Do this until you can no longer see the look of the old counter through the wet product. At this point, you cannot stop, so make sure you work quickly but carefully.
Step 4: Mixing the Highlights
Once applied, the primer will set for about an hour. During this period, mix the metallic highlight powder into phase A of the highlight epoxy resin. Note: Don’t mix with part B yet. Next, mix some of the metallic powder in your spray bottle with isopropyl alcohol. You’ll need this in a little while.
Step 5: Apply the Base Coat of Epoxy
After the hour has passed, test that the primer is tacky but doesn’t rub off on your gloves. Mix your base coat of epoxy in a bucket and stir thoroughly for at least 2 minutes. Make sure to get all bubbles and soft spots out of the mixture. You can help this by decanting between two buckets and stirring again.
Pour the base coat down the center of the countertop and then use a roller to evenly spread it over the surface of the whole counter. Try not to drizzle over the edge yet, but approach them, and push some resin into the corners. You want to create a layer about 1/8″ thick evenly across the countertop.
Step 6: Roll Over Edges
Pour a little bit of epoxy over the edges, and then go over them with your roller. Push the excess epoxy over the edge while monitoring the thickness on top. Add more epoxy to make corrections to thin spots. Once you have the edges covered and the surface remains even, it’s time for the fun part.
Step 7: Drizzle and Shape the Color Highlights
Starting small, drizzle your color highlights over the surface in your desired streak or pattern. You can use a stirring stick to create smaller streaks, and be sure to go a little bit over the edge in some places. Go over the highlights lightly with a brush to blend and texture them.
Step 8: Apply Isopropyl Solution
Now, spray the solution you made earlier over the entire counter. This will give it a much more natural finish. Go over the counter three or four times to ensure the solution binds to all of the epoxy resin.
Step 9: Tend Countertop While Setting
It will take a while for the counter to dry, and you’ll need to sit with it for a while to do some upkeep. If soft spots or gaps form, fill them in with extra epoxy. Begin scraping off drips as they fall from the edge to keep it smooth and uniform, and pick out any bugs or debris that falls into the solution over time. After tending for an hour, allow a day for the epoxy to cure.
Step 10: Smooth and Finish the Countertop
At least 24 hours after leaving to dry, use fine-grit sandpaper to sand out any protrusions. Use coarse sandpaper to get the bottom, and then dust the tops and wipe with methyl alcohol. Use a roller to apply a topcoat, and let dry. Do not handle your new epoxy countertops for one week, at which point they will be fully cured and ready for use.