
What good is a knife with a dull edge that won’t cut? Knife care is as simple as keeping the blade sharp and fresh so that it slices cleanly and smoothly without slipping, skipping, or sliding. And knife sharpening is even pretty simple to do by hand. And yet, an overwhelming majority of knife owners never sharpen their knives even if they use them every day. Don’t be like the other guy whose dull knives put him at risk for a trip to the ER. Learn how to keep your knives in tip-top shape to keep them cutting beautifully while minimizing your risk of personal injury.
Sharpening vs. Honing
There’s an important distinction to make between sharpening your knife and honing it. It’s not uncommon to see someone mistakenly trying to sharpen a knife with a honing steel, but don’t make this mistake yourself. Honing a knife straightens out the edge to keep it cutting smoothly. Sharpening a knife is the process of slightly grinding the blade down to make its edge thinner and finer.
Both of these maintenance steps are important to keep your knives cutting safely and cleanly, but each term means something different and has its own purpose. You can hone your knife after every use if you want to. At the very least, hone your knives on a weekly basis. But you should only need to sharpen your knives every couple of months (or less) depending on how often you use them.
Pros and Cons of Sharpening Your Knives
Sharpening your knives keeps the blade straight allowing your knife to find its way through even the toughest cuts. It also helps keep them looking their best, as a dull knife can develop nicks or even jagged edges and warped shapes without proper care.
A dull knife is also an enormous safety hazard. Whether you’re cutting food, cloth, or wood, blades of any kind always have to be handled with care to avoid serious personal injury. A sharp blade is smooth, allowing you to work it over cutting surfaces as needed. But even with careful guidance, a dull blade won’t stay on the path you try to take it with your fingers. Its jagged edges will catch and skip, causing the knife to move in unexpected ways or even jump. When your knife starts slipping around where you don’t mean for it to do so, your fingers are on their way to a few weeks in stitches.
Knife Sharpening Materials
All you need to effectively sharpen your knives is a good sharpening stone. But there are all kinds of tools that work as a knife sharpener. For the most part, picking the one you want to use comes down to personal preference. However, there is something to be said for whetstones in particular, as they’re one of the oldest methods of sharpening knives.
Types of Knife Sharpeners
Many types of knife sharpener tools can be found at your local hardware store or a restaurant & kitchen supply shop if you’re sharpening kitchen knives. They’re pretty inexpensive, except for high-end electric sharpeners. Many of the most popular tools are available for under $50, although that doesn’t mean that premium sharpening tools don’t have their advantages.
How can you possibly know which knife sharpening tool is best for you? Let’s talk about the differences between knife sharpeners and how to select the best one for your knives.
Whetstones
Whetstones, or sharpening stones, are the oldest and most common tools for sharpening knife blades. At a glance, they’re not much more than a simple block of stone (or metal, in some cases). However, they’re exactly what you need to slowly and meticulously sharpen your blade and mold it back to its straight form.
Sharpening stones are effective for even the dullest knives and are a great sharpening tool to use for unique blades like scissors or straight razors. As you rub the edge of the blade perpendicularly across the whetstone, you have ultra-fine control over the angle and pressure of each stroke, allowing you to achieve a sharper edge even than the day you bought the knife.
Pull-Through Sharpeners
Pull-through knife sharpeners are small manual mechanical devices that perform the sharpening action on your knife as you guide the blade through its opening. The advantage of pull-through knife sharpeners is that they take a lot less physical labor from you to achieve the desired end result.
It takes fewer strokes pulling the knife through the sharpener than it does rubbing it against a sharpening stone to get your edge sharp. However, pull-through knife sharpeners are controversial. Many of them employ gimmicky technology like water features claiming that they do things that other sharpeners can’t.
It’s common for inexpensive pull-through sharpeners to be made from cheap plastic and other parts that cause them to fall apart or break quickly. Even worse, if the sharpening material inside the cutter isn’t the proper grade, it won’t sharpen your knives, but it will have one of two detrimental effects instead.
If the sharpener is too soft, your blade will simply overpower it, cutting it instead of being cut by it, and getting even duller in the process. On the flip side, if the sharpener is too hard, it will remove too much metal from your knife. While it may shave the blade into a sharper edge, it will also shave years of life off of your knife’s longevity. In general, pull-through knife sharpeners are not the best way to go unless you’re sharpening very inexpensive cutting tools that aren’t worth the time and effort for more proper sharpening.
Electric Sharpeners
Thanks to 20th-century technology we now have electric sharpeners that can do most of the heavy lifting for us. Unlike pull-through sharpeners, electric sharpeners can’t be made from low-quality, inexpensive parts, or else they just don’t work. As a result, an electric sharpener tends to be an effective tool for all kinds of knives.
The biggest drawback with electric sharpeners is that you have no control over the sharpening process. Even sharpeners with adjustable settings or multiple cutters don’t give you the flexibility to work the blade exactly the way you think it should be worked. Some electric sharpener users say they use their electric knife sharpener to handle the bulk of the job, but they still take the knife to a whetstone when it’s done to finish the job.
How to Sharpen a Knife
Considering the different advantages of each kind of knife sharpener, we’re going to talk about how to sharpen a knife with a whetstone. Besides being the longest-running knife sharpening practice, it gives you the skills to sharpen any knife in any situation regardless of how dull it is.
Whetstones are inexpensive, and you can find them in almost any store that sells high-quality kitchenware or outdoorsman’s utilities. Like most products, you get what you pay for with a whetstone, so it’s worth investing in a slightly better one since they’re already an affordable product overall.
Safety First
When sharpening your knife with a whetstone, keep the cutting edge away from you as much as possible. Always motion away from your body, and never stroke the blade across the whetstone towards your body. Thick gloves will help protect your fingers in case of any accidents, though you’ll want to hold the knife firmly with your fingers positioned away from the cutting edge of the blade.
Using a Whetstone
There is some controversy as to whether or not you should wet the whetstone or keep it dry for sharpening. Traditionally, the stone is soaked in water or coated with sharpening oil before you sharpen your knife. This helps prevent the stone’s pores from clogging up with tiny flecks of dust and waste from grinding down the blade.
A dry whetstone also carries more risk of clipping or skipping the blade on the stone if mishandled. If you make a mistake with an oiled whetstone, the blade will glide more easily along the surface making it easier to maintain control.
Determine the Correct Angle
Most western knives should be sharpened at a 22.5-degree angle for best results. Kitchen knives fall generally somewhere in the 17 to 20-degree angle range, while Asian knives can be closer to 15 degrees. For most jobs, 22.5-degrees will be sufficient.
To get close to the correct angle, hold the blade at a 90-degree angle from the whetstone, then angle it halfway down to 45 degrees. Then, go halfway between 45 and 0 degrees to find 22.5 degrees.
Redefine the Edge
Your whetstone should have a coarse grit and fine grit, one on either side. You’ll sharpen your knife on the coarse grit first and then on the fine grit.
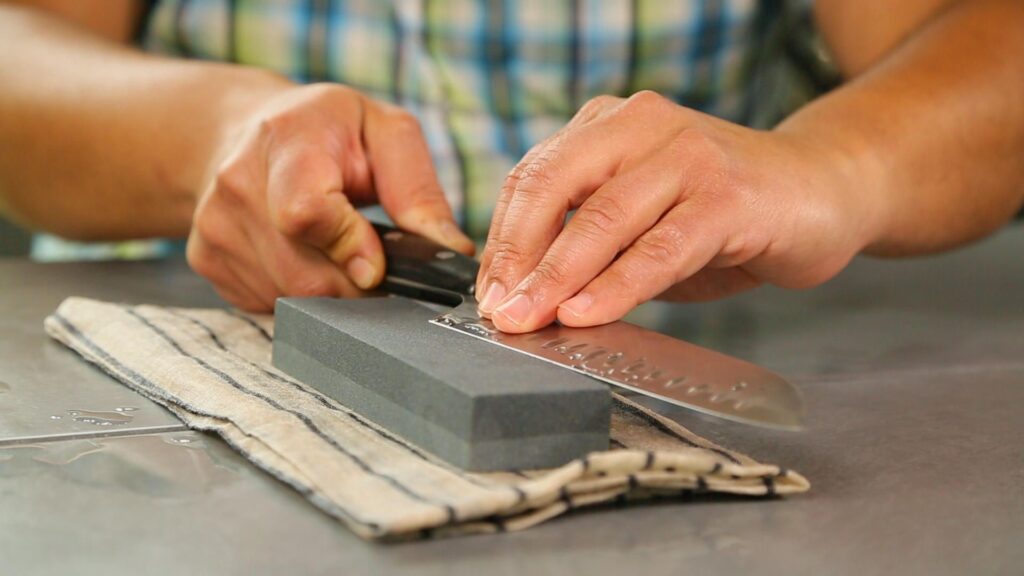
Use one hand to hold the knife by its handle and put the cutting edge of the knife against the whetstone (at the correct angle) with the point first. Using medium pressure, glide the blade over the whetstone being sure to sharpen the entire length of the blade. Keep the blade at the same angle throughout, using your other hand to carefully stabilize it (while keeping your fingers away from the sharp side of the blade).
Repeat this sharpening stroke on the first knife edge 10 to 15 times, then flip the blade over and repeat. Then, turn the whetstone over and repeat each edge on the fine grit side. This polish on the fine grit side of the stone will bring your knife to a razor-sharp finish.
Honing Your Knives for Maintenance
Once your knives are sharp, you’ll still want to hone them regularly to help keep them as straight as possible. A honing steel is a simple tool that allows you to re-straighten the edge of a sharp knife to make it last longer between sharpenings.
Hold your honing steel in one hand and firmly press the tip of it down into a cutting board. Holding your sharp knife at a 15 to 20-degree angle, start with the bottom of the blade near the handle of the honing steel. Drag it down and outward until the tip of your knife meets the tip of the steel. Make sure to use a firm motion and don’t go too slow or you’ll your work will be inconsistent.
Hone one side of the knife and then the other and then check each side. If one side is uneven, continue honing your blade until your knife has a smooth and even appearance. Test your work by slicing up your favorite veggies as an after-sharpening snack!