3-way switch wiring isn’t the most complicated electrical job in the world, but it’s not quite as simple as a 2-way switch. After all, there’s another whole way! OK, corny commentary aside, 3-way switch wiring is useful for a number of applications, but it’s not always easy to remember the three-way wire orientation. It’s handy to have a guide you can look to when the right three-way setup slips your mind, particularly if it’s an installation you haven’t performed very much in the past. After all, each wire serves an important purpose in a three-way configuration, and there’s a different wiring diagram depending on where the power enters the circuit.

Let’s talk about 3-way switch wiring, how it works, and how to perform a simple installation. Safety note: electrical wiring can be dangerous and may cause serious injury if performed improperly. Don’t attempt to work on electrical wiring if you don’t have any training. Always turn off the power source before performing any electrical work.
Table of contents
What is 3-Way Switch Wiring Used For?
3-way switches are good for when you need to wire a light fixture that has controls in different locations. A common example is a 3-way switch at both ends of a staircase. Some rooms have two or more entryways located far apart from each other. In all of these applications, either one of the 3-way switches in the circuit can complete or sever the connection.
How 3-Way Switch Wiring Works
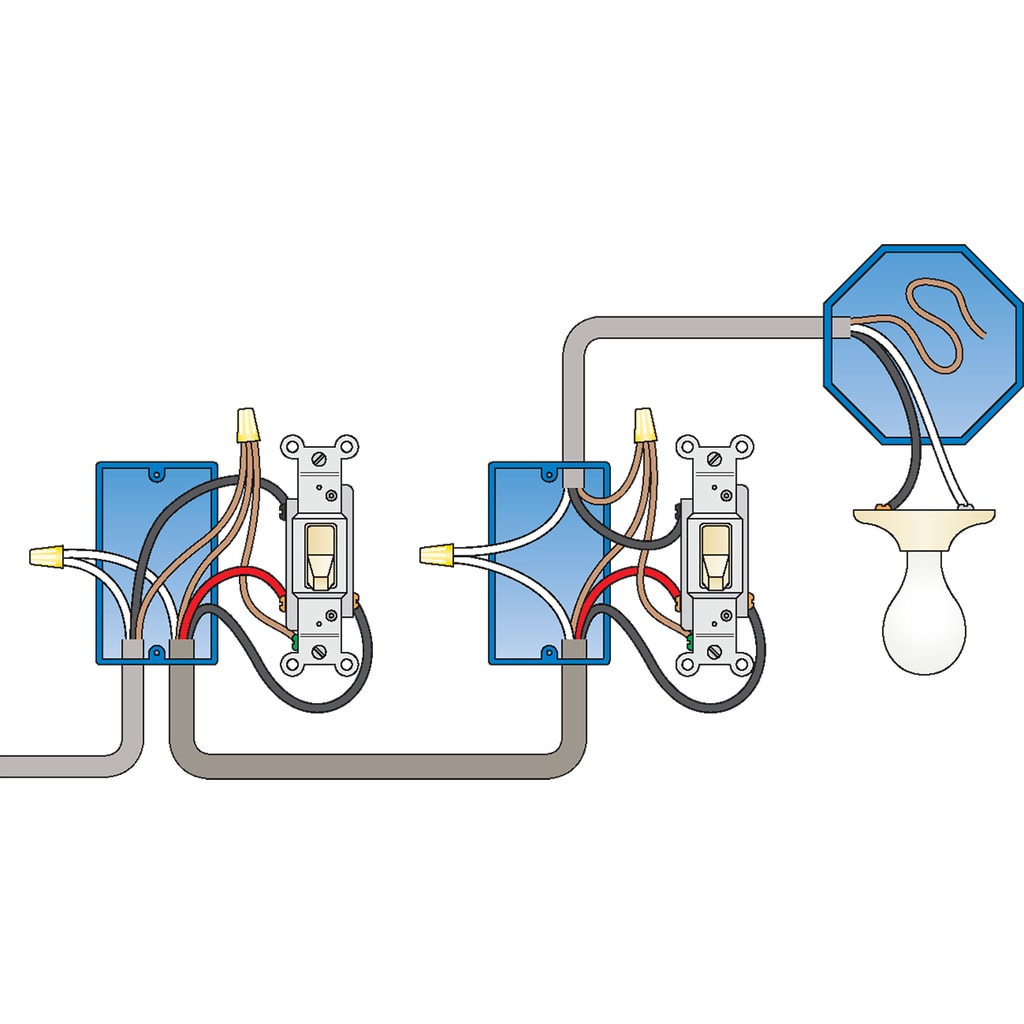
A 2-way switch has its two screw terminals (and the ground wire) so that it can flip on or off a single light fixture. However, a 3-way switch has three screw terminals (and the ground). The darker-colored terminal is called the “common terminal.” The common terminal is the switch component that sends power from the source to its destination. That destination might be either the light fixture itself or the other switch, where it will be forwarded to the light fixture.
The other screws on the 3-way light switch box are called the traveler terminals. These connect wires called the traveler wires, which carry power between each light switch box. Alternatively, the switch wires may interrupt the circuit, depending on which way the light switch is flipped.
Types of Connections for 3-Way Switch Wiring
Depending on the make of the light switch you have, the connections at the common terminal and traveler terminals may be slightly different. A light switch may even allow for multiple methods of connecting a wire or wires for power, allowing you to use your preferred way. Every light switch will have screws on the side. A 3-way switch may have slots or holes you can use to insert the wire or wires. You might even have a light switch with a spring-mount that lets you quickly and easily snap the wire or wires in place.
Regardless of the configuration of your light switch, the concept is the same. The connections clamp the hot wire and traveler wires to the screws in the switch to make a solid electrical circuit.
Properly Wiring a 3-Way Switch
Important Note: This guide is only for working with copper wire. If your wires are gray, then they are aluminum wires. Do not work on aluminum wire yourself; call a professional to help with wiring a 3-way switch for aluminum.
There are a couple of different ways you might wire your 3-way switch depending on where the power flows into your circuit. This could occur at either switch location or at the light fixture itself. Check each wiring diagram for a better idea of what to look for.
No matter which switch wiring orientation the wiring diagram recommends for your 3-way switches, you’re going to follow the same general steps to power your new circuit.
As with any electrical project, start by turning off the circuit at your breaker box. You want to do this before touching a single wire.
Next, you’re going to add an electrical box for the second of the two 3-way switches. You might actually need to replace the original box with a bigger box that can handle more wire. You’ll use one of two wire gauges: 14-3 NM wire or 12-3 NM wire. The 14-3 wire will have a red, black, and white connector and a ground wire.
Run your wire through the boxes to connect them. Consulting the wiring diagram, affix each wire to the appropriate 3-way switch. It’s a good idea to wrap each hot traveler wire in electrical tape so you can keep track of them, especially if they’re all the same color (the white ones).
At this point, you’re going to follow your specific wiring diagram. Make sure to understand where each wire connects to each 3-way switch and the light. You also need to know where the power is entering the circuit, whether it’s from the first 3-way switch, the second switch, or the light.